
Chapter 2: This Vortal Coil
Chapter 3: Freeman Pontifex
Chapter 4: Riding Shotgun
Chapter 5: Under the Radar
Chapter 6: Our Mutual Fiend
Chapter 7: T-Minus One
Chapter 1: To The White Forest


She will run to the left to get a view of the ruined city. When the storm
thing comes rushing toward you, don't worry, just turn around and watch the
bridge.

Now backtrack a bit to find the fence on the left is now open. Take that path,
blast away the board at the top of the slope, and don't forget that you have
a flashlight (press Y on the 360). Drop through a hole in the floor to confirm
your fears that dark places will usually lead to zombies; they're dead now,
thankfully. Blast away the debris and crawl under the obstruction.

Pick up the saw blade on the wall and go toward the opening. Zoom down the
way to see a battle of monsters (click the RS on 360). When you go down the
small steps, look right and kill the lone zombie in the corner. Use the barrels
in this area to kill the rising zombies down the way (careful Alyx doesn't hit
one as you hold it). There is one extra zombie in the dark pit, FYI. When you
get to the end of the tunnel a Zombine (zombie Combine) will show up and end
the never-ending battle of undead and bug.

Pick up the green health tubes and move through the door, go ahead and keep
the saw blade if you like it. Inside Alyx will use the equipment to try and
send a message. After the no-go, she hops up to an area and then a cable will
fall down. Pick that up with your gun and walk it into the red slot on the
wall with the other cables. Then just watch.

After the scene, go out through the other door. Pull in and then toss the crate
into a nearby wall to get the health inside (you press LT when you have the
blade to drop it, then pick it back up). Move into the tunnel and look right
to see a headcrab down the way, so send your blade into it. Go down to the
boarded exit, pick up your blade, and send it into a wall so you don't forget
it.

Now go up the rails to the cart stuck behind some boards. Just blast each board
to move them and free the cart. It will open the path of course. Go back down,
pick up your blade, and keep moving.

After Alyx speaks, go up the path to the right. At the fence, follow a path on
the left to get into the next area. Drop the blade somewhere and find a ladder
between the trains. Go up, hop over some gaps, blast away a piece of metal
on a roof, and drop down into a room. When you fall down, look right to see
something looking in on you. Then go press the green button.

You can't use the door, so look on the floor for a yellow bar. Pull that bar
out of the slots with your gun and then drop through. Crouch, clear the crate
out of the way, and then follow the path for an interesting scene.

Your friend will free you, so just sit back until then. After you know this
has become an escort mission, pick up your blade and head through the open
gate. Only one path, so follow it and break the boards in your way. When you
reach the elevator, drop your blade inside and hop in. When you're ready, use
your gun to pull in the crowbar, then it's bye-bye for you.

Use the old friend to smash the boards and emerge in the mines all by yourself.
Enter the shack and grab the suit power-up. Open the door to find another
elevator, the manual kind. To in front of the wheel and hold down the action
button until you get slightly above the first room you see, then run into the
two items in the wall as you run into this room. Hop over the table and pick
up the pistol on the wall. Go to the hole in the floor and find some ammo in
the dead bugs.

Now look down the hole to see a fresh Antlion at the bottom. You can shoot it,
or you can hop down to the wooden boards, the ones that don't break, and use
your Gravity Gun to use a crate; either way. When you drop down, find a small
room with some ammo and armor. Follow the path and drop down yet another hole.

*NOTE: By now, you will probably lose the saw blade, but props if you can
manage to take it any further. I will just stop reminding you.*

When you drop down to the bottom there will be a headcrab. Shoot it, or just
run onto the boards over another hole and fall down; either way, fall down
this hole. In the water, press the swim button a few times and get in the rock
tunnel. Funny looking grubs on the walls. Follow the tunnel (yes, stepping on
the poor things will kill them), and then use the crowbar to smash a bug
through a web. Take the path on the right, smash another web, and then fall
through another hole.

When you drop down, quickly turn left and start shooting at the new Acid
Antion Worker and be sure to dodge his acid attack. Keep moving and shooting
until he dies (an achievement), which will take about two clips of ammo. Pick
up the red box of ammo and go around the corner. There will be two more acid
bugs at the end. Run and dodge your way into a little area on the left of this
tunnel to find not only a shotgun, but also a few grenades (under the table).
You can either hurl gas tanks, toss grenades, or rush and shoot them with
shotgun shells, either way, get rid of the bugs (despite how it looks, you can
crouch to enter their little area). Break the crates for some supplies.

*NOTE: You didn't have to kill the bugs, I just wanted you to have those crates
in their area.*

Now fall through the hole near where you found the shotgun. Pick up a magnum
along the small tunnel. Use the Gravity Gun on the other side to clear the
debris trapping you in. When you're back on solid ground, use the GG to clear
the path. Two more acid bugs will appear, so just use the gas tanks provided
to kill them (careful not to launch one into something close).

*NOTE: It might be a better idea to use the rocks instead of the gas tanks.*

*NOTE: Now might be the time to tell you that each little grub you kill will
drop some yellow dots. Those dots replenish just a little health. The grubs
also get an achievement, but don't waste time on that now.*

In the cavern, go right to find the path that takes you up and to another web.
After you break it, another acid bug shows up. Kill him with rocks and keep
moving. When you drop into another area, another bug shows up. Kill him and
move on. Dive into the water of the next area and bust a web to grab some
health, then go down further into the same hole to bust another web for some
suit armor. Now take the adjacent tunnel. Have your crowbar ready when on the
other side you run into an Antlion in the water. Whack it a few times and
emerge.

Zoom down the way to see not only some bugs tearing into something, but also
the tongues of familiar enemies. When you move forward a bit those Antlions
will come for you, but some will get stuck. One may get to you, so be ready.
Keep the ceiling monsters alive as you move around them because more Antlions
will show up. Kill whichever ones don't get caught.

Get to the other side, watch for the tongues, and keep moving. In the narrow
tunnel, be ready for another bug. Have your shotgun ready when you enter the
next area as about three more Antlions will appear, but hopefully some will
drown in the water. Kill the acid one that remains.

Follow the path until you run into abour three more acid Antlions in a small,
round area. Then keep follow the path past another web until you hit a
loading screen.


Chapter 2: This Vortal Coil


Just up the way is a hole that drops you into the friendly base. Follow the
dudes down the ramp to see Alyx, but more importantly, there is the SMG and a
bunch of ammo along the wall. After you get all that, follow the men up to the
demonstration of how the next fight will work. Pick up some shotgun shells from
the big ammo box nearby.

*NOTE: A wise move would be to use the big SMG crate to get SMG ammo. Then you
should go find all the crates and bust them. Then move all the health packs
onto the ramp. This will help when the fighting starts and you'll have health
whenever you need it.*

*NOTE: You could even set all the mines before the demonstration, but the mines
won't help you much on the early attacks and there will be no time to set
them for the late attacks. You could just ignore the mines to be honest.*

Before things get messy, go pick up the other turret by the next tunnel with
the GG and set it in front of this tunnel. Make sure both turrets are somewhat
spread apart. That will handle this tunnel as the first bugs show up, and you
don't even have to help.

Now, as that battle starts, let's give each tunnel a number. #1 is the small
tunnel to the left that is no more than a hole in the wall, #2 is the tunnel
the first attack comes from, #3 the one to the right of 2, and #4 is the one
on the very right. The first attack comes to 2, so don't worry about that one.
With two turrets and your friends, single-light attacks will be easy.

The next attack comes from 1, so place both turrets there after the first
attack. Then, as they fight, go to the dumpsters and find some mines. Set
out two as far apart and as far from where you will place the turrets as
possible, and try to keep them in the middle of a tunnel.

After the second battle is over, then set the turrets up at 4 as you set out
more mines along the other tunnels.

Then you get a dual attack on 2 and 3. Your friends should cover 2, so just
put one turret over there. You take the other turret with you to 3 and you
will have to help defend that tunnel.

*NOTE: I can't explain it very well, but I will say that you can set the
turrets up in ways so that they cover multiple tunnels. But if I explain
exactly how to do this it would confuse people even more. Just know that you
can set the turrets back-to-back or side-by-side and have them cover more
angles.

Then you get a triple-threat to 1, 3, and 4. Your friends take 1, so let them
go it alone. You set the turrets on the other two and you try to help both.
I advise launching a few mines down one tunnel with the GG, then going to the
other to help with your SMG.

Then you the same attack, but a two-light on 4. Your friends take 4, so let
them be. Set the turrets on 1 and 3 and you help on 1.

Next is a full house. You don't have much time, so listen well. Set up both
turrets next to 2, but make sure they are at an angle so that they can cover
1 and 2. That just leaves you to juggle 3 and 4 with your friends, so good
luck.

*NOTE: Pick up more shotgun ammo if you run out.

After that, another quad attack, but this time a two-light on 2. Set both
turrets on tunnels with single-lights, and you take the one with two. If things
get to hairy for you, retreat and reposition your turrets to help cover the
more threatening tunnel. You will lose both turrets during this fight, not
much you can do about it.

After that, then is a three-light attack down 3!!! Not really. It's just more
friends. But then you get three-lights, on EVERY tunnel! It's for real this
time. However, your three new allies will kick some serious tail. All you
really have to do is sit back at the bottom of the ramp and watch. They'll
take care of everything.

Now that the battle is really over, collect the ammo and maybe the health from
tunnel 4. Then watch the Vorts heal your girl. You learn that something is
needed to heal her, so the lead Vort will take you down a tunnel, follow. After
he opens the gate, you take the lead, so enter the hole in the wall.

Open some webs along the path and then you run into some more Antlions. He
will shock them, so either toss a grenade at them or run up and start shooting
away with your shotgun. Then there will be more "Acidlions" as he refers to
them (so will I), and that's pretty much the story of this place. After you
get past this room, the next will have more bugs. Follow the winding path in
here to keep moving. After this room you enter a quiet tunnel with another
web cache.

Proceed and there will be more bugs in the narrow tunnel, so use either the
magnum or SMG for long range. Keep going and you'll see a web cache above
you. Zap it with the GG and then grab the grenade before it goes off, or get
way out the way. Then send something up into this hole for another web cache.

Moving on, you eventually find a hole that drops you back into the mine. Don't
you dare walk onto the wooden floor for those boxes. Use the GG to bring them
to you, or walk on and see what happens (you won't die).

When you start busting the boards that cover the door, the zombies will wake
up. Just use the pistol from your side of the fence to take them out; with
headshots of course. Use the GG to open the door and collect the stuff in here.
Then pick up the gas tanks and start sending them into the corpses in the next
room. Those hyper-zombies will wake, so either blow them away or use one
magnum round to the face.

In this room you encounter another puzzle, or perhaps the first true puzzle.
You need to get that elevator to go down, but you're not heavy enough. All you
need is the bundle of metal beams and the two barrels in the corner. Grab all
three with the GG, set them on the lift, and you step on. As you descend, look
to the back to pass by an ammo crate and try to grab it; if you don't, don't
worry about it.

At the bottom, step off and have the GG ready. When you go around the corner
you will find a zombie on the left and right, and a Zombine behind the fence.
Use barrels or magnum rounds to kill them. This Zombine, and the one behind
the fence in the next room should both kill themselves with grenades.

In the next room you will find another lift. The control is behind the fence.
The idea here is to weigh down the lift just enough so that it stalls after you
press the button. Go pick up the two bundles of beams below the lift, which
you can get while the lift is down, and then grab the one in the corner. These
three items will be enough. Now go press the button, then jump on the lift,
and then toss two of the bundles off. Leave one with you.

At the top the group of zombies will rise. Use the GG and this one bundle to
take them out. Then go turn the wheel by the fence to let your friend in. Lead
him to the generator to open the gate.

Through the gate you run into a cart with three crates tide down. You can't
disturb the second cart or the whole thing will tumble over. Use the GG to
pull the free one off and then get ready. What you will do is jump on the
second cart, use the GG to blast the three crates open, and then you hop off
before you go over the edge. You will jump from the first cart to the second
one, and you not going over the edge is the first priority. He will give you
props if you pull it off.

Now move down the tunnel for one lone zombie. Then you run into some boards
blocking the way. You can shoot at the cart at the top of the slope to come
crashing down, or your friend will do that for you. Either way, get through and
start killing the zombies and Acidlions in the tunnel.

At the top is a ladder, so take it. Follow the path and you find an odd
container in a room. This container can be pushed using the GG. Move it out of
the way of the hole in the floor, and if you want you can shoot its bottom
until it flips over and drops some grenades, just watch out for the live one.
Then drop through the hole.

I'm not even going to say anything because you need to experience this scare
for all it's worth. I'll pick you up after you climb out of the hole.

Did it get ya? I hope so. After you are reunited with the Vort, all you have
to do is go up a bit and then turn left. But if you need more suit armor, use
the sprint button (LB on 360) to find some at the top of the slope, then
come back and get on track.

Go to the edge and follow it left to find the bridge-way. Cross it and then
follow the tunnel. When you get close to the pounding machine, just jump down
and get right next to it. Just stay there and wait for the Vort to show up,
but have your shotgun ready for the zombies and Zombine. All heck will break
loose, so be ready. You can try to use the GG and send exploding barrels all
over, but it doesn't work so well. Let the bugs and zombies and the Vort kill
each other as you just look out for yourself.

There is a lot to do in this area. For one, there are tons of crates all over.
Find the ladders around the pounder and you will have the view of the crates
and items up high, not just on this structure but also on the other one nearby.
It is wise to send all the crates, from the structures and from the four
tunnel-ways, send all the crates into the ramp leading to the elevator. This
is all in preparation of the coming fight. Then set the mines around the
pounder.

*NOTE: Save now! I ran into a glitch here. What you don't want to see is the
Vort run into one of the buildings when this next battle starts. If he does
he will not come out for some reason. He must stay in the open. After you
get on the lift, he should get on the other. If that doesn't happen, reload
this save.*

When ready, go push the green button by the elevator. This will trigger a
huge battle where undead and bugs will come from all sides. Just use the
SMG and make circles around the ramp for as long as you can. If things get
too hot around you, just bail out and start running all over, but always come
back to the ramp. When the elevator arrives, jump on. He will stay behind, so
just watch him and maybe help him if you wish. When you get to the top, step
off and look down to wait for him to hop on the other lift.

Once the two of you are back together, he will open the next gate. Follow the
path and move the debris blocking the door. On the other side you are teased
with the thought of fighting the boss, but not yet. Go up the path and drop
down a hole. At the fence, use the GG to blast some boards on the other side
that prop up the gate.

In the rail tunnel, go left if you need some SMG ammo. Go right and bust a
board to open the gate to keep moving. At the elevator, go around it to find
the path to the tunnel below. Stand back of the edge a bit, then sprint and
jump to the other side below. The fan will turn on when you bust the object.
Try to fight the wind and then the thing will break. You will notice one
set of blades is missing. Use the GG to turn the fan and get the area with
the missing blades on the bottom. Then crawl under.

Follow the path to a hole in the floor. Take it and keep popping the webs
until you fall into water. Behind you is a single unit of suit armor, as well
as a Barnacle. Get your crowbar in hand and go under water, find the web at
the bottom, bust it, go through, bust the next one, and the get some air on
the other side. Turn around, avoid the tongues, and find a space you can
walk on. Take the tunnel on the wall, a much different tunnel.

At the end will be two Acidlions to greet you. Take the path on the right
to run into a medkit, and then go right at the fork in the road (if you go
left you just circle back around to where you started).

Have your SMG in hand, and when you're ready drop off the ledge. Move around
the rock to get a view of the coming guardian. You don't have to shoot him,
but if you do you can use the grenade on the SMG to stall him a bit. What you
want him to do is ram into the stalagtite (or mite, whatever) and that will
stun him for a second. That is when you sprint around him until you find a
small tunnel to climb in. Do it right and he will run away in frustration
once you're in.

Crawl through and watch him go by you at the end. Go out and head left. When
you see a medkit, quickly run to the left of it and duck inside another small
tunnel. Follow this tunnel to the end. Crack the web and watch him run by
you yet again.

Come out and run right to pick up some suit armor as you run for another
tunnel. Follow this one to its end.

Now, before you go out of this tunnel you must know the gameplan. The path
here goes in a circle. He is behind the rock and he will come from the right
when you step out. So what you want to do is run left and then take the path
that leads to where he came from; if you to in the opposite direction you
just end up at the place you came from. Now he may come from the left, so in
either case just go the opposite direction. You will have to sprint for a
long ways (he may get a swipe at you) but there will be a tunnel to hide in.

You're not done yet, this tunnel leads nowhere. You have to come back out and
run to the left until you hop down, then immediately go right to find another
tunnel. Follow this one to its end.

Have either the GG or the SMG in hand. When you emerge, sprint to the left
until you reach some boards against a hole in the wall. Bust them quickly and
hop in. He will be on your tail and take some shots at you while you're in
here. So look quickly look down and bust some boards on the ground to get to
safety.

Follow the rail to a large room. On the right you will find two web caches, and
one will have a poison headcrab. The lift will not be working, so go directly
in front of it to find a machine in a pool of water. Pull the cog off that
machine and take it to the turning cogs on the elevator machine. Either kill
the Barnacle in your way, or move the cog around it and get it to fit in the
middle of the machine. When the all the cogs are turning, pull the lever. Now
go to the elevator and push the green button to bring down your friend.

Follow him to a generator and then to the prize. He will extract some larvae
and then you guys head back up.

Get into place in the circle of Vorts as you heal Alyx. Then you get another
one of those classic scenes from Valve that makes little sense. After, be
sure to get full ammo from both crates and then get on the elevator. Move
along to find that the Antlions are none too happy with you. Keep moving and
drop down to end this chapter.


Chapter 3: Freeman Pontifex


Go up to finally reach open air. Zoom in to the bridge to see the Combine on
the move. Then move around the barrels on the left to find the path leading
down. Go left to hit the open path full of pounders. You need to run along
the first three pounders to avoid the endless Antlions. There are crates along
the way, but they only have health. When you reach the third one, rest inside
a small shack on the right that will protect you from the acid.

When you leave the safety of the third pounder, get out the GG as you approach
the rails in the ground. At both ends will emerge big Antlion Guards. With the
Gravity Gun, pick up the red barrels and start tossing them, but try to focus
on just one. The sprint button will be your friend during this fight. You need
to run all over, but try to lead the guards into walls. If they charge at you,
get by a wall, and then run out of the way when they get close. When stunned
you have a little bit of time to hit them. You don't have time for grenades,
but be sure to use any you may have in the SMG (the alt fire, press LT). You
can ignore the smaller bugs, just focus on one guard. When the first one goes
down, then go for the other with the shotgun/magnum.

*NOTE: You can go back into the pounder area for more barrels if you want.*

After Alyx and the Vort rejoin you, he will open the lift nearby, but it gets
stuck. Climb up the ladder and then take the grassy path on the right side.
Watch out for the headcrab. Go around the pod and gently move onto the wooden
board so that it will fall away. Then you must jump the gap to reach the other
planks. When you get close, look on top of the elevator to the wooden board
holding the hatch. Use the GG to break that piece of wood, then knock off the
metal hatch, and then drop down. Pull out the pickaxe and you're done. Press
the button to get everyone up. Then follow the path to a load point.

Proceed until you find the Pulse-Rifle with a bunch of health and dead guys.
Soon you get a bit of a scene about your next task. Move to the force-field
and wait for Alyx to open it. Go through and find a room with a large water
tank. Move the green shelf, carts, and wooden boards blocking the elevator
shaft, then hop down. Crouch, turn on your flashlight, and move the objects
in your way. Then bust the wooden boards and hop down.

You probably hear that creepy noise. Crawl through the hole into the dark
room. When you move the chair from the door, the big zombie will bust through.
You should crawl back out of the room and drop a grenade behind you (press LT
on 360). The thing will crash through the wall to get to you, so maybe toss
it another frag, then finish it off with the shotgun.

Go through and bust the planks on the floor to get down another level. Look
on top of the elevator and get the hatch off. Jump to the other side of the
elevator (not down) and look down to see two poison headcrabs. Shoot them
before dropping down. Go through the door in here to enter a staircase where
you find that Alyx has the sniper rifle working. Go down and through the door
at the bottom.

In the next room, look down and quickly use the GG to grab the two crates or
else Barnacles will claim them. Then drop down and pick up a barrel. Behind
you will be a bunch of tongues in front of a doorway. Put the barrel in one
tongue and slip by. Then break the boards blocking the path to see more
tongues in your way. You should pick up one of the gas tanks in here and send
it up to the Barnacles, but make sure you stand back. Cross the big plank in
the middle to get over the gap.

Watch as the torso zombie gets burned in the fire, then maybe wait for another
to so the same. Turn the valve to extinguish the flames. Go across and look
down the steps to see another zombie. Just toss down a grenade. If you want,
you don't have to, but you can open the door he was banging on to find a room
full of undead and crates. Be sure to toss in a grenade first and use the
shotgun to mop up the survivors. Then go down the steps.

You can investigate the rumbling in the blue container; it's a fast zombie if
you get too close. Break the lock on the door and go through. Let Alyx handle
the zombies in this corridor. Crawl through a space at the end. When you
emerge, quickly toss a grenade down the steps, then back out of the line-of-
sight of the carrier zombie at the bottom. Alyx will handle all of them if you
just want to hide in the corner, or go back through the crawlspace.

When the coast is clear, go down the steps to find a locked door. Back away
from it and hide behind the fence in front of the door and get your shotgun
ready for the zombies that emerge. Alyx will handle what gets up the steps, but
you can use the gas tanks to help. Then go through the doorway.

Go down the hallway and as soon as you turn the corner blast the second barrel
to take out the zombies and Barnacles. Ignore the other barrel and mop up
any remaining headcrabs. When you moved toward the boarded up doorway, have the
shotgun ready for a Zombine. Don't miss the shotgun shells in a crate behind
the pipes, then proceed up the steps.

Go right to find just some rifle ammo. Then follow the path up a ladder. Use
the GG to blast the metal pieces covering the tops of the roof. Don't fall
down through a hole, just make the roof clear so that Alyx can snipe some of
the undead below.

Have your shotgun ready and drop down onto the platform standing above the
ground. Defend this for as long as possible from the zombies that will try to
smash it down. When it does crash and you're on the ground, all heck breaks
loose. You will have zombies all over in no time. But use the saw blades on
the walls to help ease the trouble.

After the first wave the game should save, but then you get another wave. A
huge group will crash through the wall on one side, and more will come from
the other side. Drop some grenades, slice the Zombines, and just run around
in circles hoping Alyx has you covered. Use the shotgun to finish up.

When all is calm, search for crates and supplies. The fence trapping one
zombie has a crate, but you just need the GG to pull the crate over the fence.
Then follow the path from the broken wall to find the trail.

You arrive in a dark storage room. Crawl under the shelves on the right to find
a crawlspace. You run into a fast torso at the end, and then another around
the corner. Hop up on the wooden platform and keep hopping along to get to
the other side of the room. In this closed off area you need to get up to the
top platform on the wall, but no shelves will take you there. Use the GG to
bring a crate and set it on the lift of the forklift. Then go toward the
driver seat and pull the lever. Quickly get on the lift as it goes up. Then
put the crate on the side of the lift near the top platform and jump up. Break
the vent cover and crawl through.

At the end you drop down in the radioactive waste area. Drop down through a
hole to hit the ground level. Watch out for all the zombies in the sludge. You
can jump from ground to ground without the aid of the objects. Hop over, be
sure to kill the Zombine when he rises, and then follow the edge around the
pool to get through the opening in the fence. Use the barrels to kill the
zombies that attack you behind the fence, then climb up the ladder. Stock up
on SMG ammo at the box. You will find a crate behind a fence, so just pull it
over the top with the GG as before. Then crawl under the pipes to drop down
on the other side.

Have your magnum ready when you move toward the next waste pool. A headcrab
carrying zombie will appear, so take him out quickly and dodge the headcrabs
he tosses. Jump to the wooden roll in the waste to reach to pipes that lead
up to a crate. Bust the crate and then jump down to the ground with the other
crate, then pull whatever fell out of the first crate with the GG.

Now comes another fun radioactive waste puzzle. The object is to use the rolls
throughout to make yourself "bridges" to safe ground. Pull the roll across the
waste to you, and bring the one from the waste behind you. First jump on the
car and to the first rock, then jump onto the second rock. When you jump on
the next car it will begin to sink into the waste. You can either quickly
pull the roll from the third rock into the waste to create a platform, or you
can jump back and use all three rolls to make a moving bridge, but using the
car is easier.

When you reach the third rock you need to quickly pull out your shotgun and
start shooting the gas tanks in the sludge. Whatever you do, don't let the
Zombine get close with a grenade. When all are dead, use the four rolls you
have to get to the fourth rock. Once you get there, pull out the shotgun for
more zombie fun, but Alyx should get all three.

Make your way to the fifth rock where the last trio of zombies will attack, so
use the gas tanks to kill them. Pull the crate for the sixth rock way away to
you with the GG and then get over to the ladder. Head up and up until you
find a small shack. Go inside, but be ready for the fast zombie in here to
wake up and the Zombine outside to awake. Kill both and claim the rewards in
the room. On top of a ladder on the adjacent building is a crate with some
health.

Go up the slope to reach the bridge at long last. When you get to the car,
disaster strikes of course. Go to the left to find a crate, but also on this
small walkway is a ladder. Get on top of the red railing to find a path back
onto the middle of the bridge. It took a while, but the trick is to push all
the cars off the bridge. This will cause the thing to tip down to the side
where your car waits. When you get all the cars off, hop off the low end of
the bridge and get back up to your car. Drive it onto the see-saw bridge and
jump off the high end (you don't need to turbo, but you can).

When back on the side with your friends, collect the stuff around (look in the
dumpster) and then climb a ladder to find the button that unlocks the door.
Reunite and say your goodbyes to your Vort friend. After he opens the gate,
hop in your ride and get going toward the light.

Chapter 4: Riding Shotgun

Follow the road a bit and then take the detour off to the side. Follow the
water back a bit and then take the dirt path on the right. Head past a gate
and toward the tower. Get out near the tower and then turn around. Go left of
the big building nearest you and find a path that takes you to the roof. Find
a hole that drops you into the building. Find the items around and then go out
to a smaller, adjacent building with the walls blown off. On the mound of dirt
is a hole inside the locked room.

She stays behind as you go inside. Drop down a hole to reach the power room.
Get out your GG and move the wooden thing on the wall. In total, there are
five power slots in this room. The two near the elevator will have a small
cord; the three near the power box will have a long cord. Swap the two cords.
Put the longer one on the two by the elevator, then take the short one and
connect it to the two slots closest to each other (making a straight line). If
you connect the power generator line to the lower slot, it will just break.

When the power is restored, take the elevator back up. You run into a Hunter,
actually, you run into three. Duck behind the wall on the left of the door to
hide from their attacks. Use the grenades on the SMG to poke out and take a
shot at them. When the wall is torn down, either use the SMG or rifle to kill
the first two; you may have to run around to avoid their attacks if they
charge at you. Then come out of the room and look to the roof for the third
one. There are barrels behind you if you have time to use them, or just fight
the thing straight up, much like how you fought the Antlion guards.

When you come out of the gate for this building-complex, two more Hunters
appear: one from the right, one from the building in front of you. Use grenades
and magnum rounds to finish off these two, they're not that tough.

After the fight, go into the building just opened and find some supplies in the
bathroom, then go to the radio in the other corner. After that, go into the
only remaining building by the gate to get a lone crate. Then return to your
car and go through that gate.

Go left when you see some wooden fences to find the path. After you jump a
small ledge you hit a load point.

Keep going until Alyx sees a familiar sight, then go left. Around the burning
wreckage, go right and into a farm-like estate with a locked fence. Get out
at the fence and first enter the house on the right side for no more than
some crates.

Then go to the left building and break the lock on a door. Go through and find
a hole in the floor that you can take. Follow this path to the inside of the
barn. You find an Advisor and Alyx intends to pull the plug on it. Use the GG
to blast the power ball inside the chamber and then you get a bit of a scene.

After your close-call, look to the door in the corner in anticipation of your
first run-in with the Combine soldiers. Kill the first guy and enter the room
to find your old crossbow, use it on the next guy and then the next. Collect
the items and go back outside to snipe some more in the opposite building.
When things die down a bit, just run to your car and hop in. Push the pedal
and dash by the Hunter and company.

Go around the cars in your path and then turn to follow the railway. Do your
best to beat and dodge the mines the helicopter drops. Just weave in and out
of the train cars, hitting some crates along the way, until you enter the
tunnels leading to the next area.

Go forward and jump through the ramp. Follow the path on the left of the the
trains. A zombie will jump on, but just swing around when you get to the dead-
end to fling him off. Now turn around and take the path that was on the right
of the trains, now it's the left. Fly past some zombies and try to avoid the
Barnacles. Keep following the railway until you see some trains in the way,
then to right and through a friendly gate with the Half-Life logo.

Ditch the car and follow your new friend. Don't follow him around the corner,
because he gone. Then hop down and crawl under the train car. Knock some wood
boards out of the way near a mine, and then use the GG to pull that mine to
break it. Then crawl through and keep crawling under the train to get to
open ground.

When you get out to join the Resistance, go to the large building in front of
you, go up some steps, and use the suit station to fill up your suit armor.
Now get out your Gravity Gun and come outside. Locate a mine and pick it up.
The idea is to send three of these into the chopper, which is easy since you
get a good amount of time to hold them.

After three, take cover because the chopper will drop a ton of mines that
you shouldn't get near. Then resume your attack with more mines. You just
need two more or so and the helicopter threat is no more.

Search the area for more supplies and then follow your allies into a building.

Chapter 5: Under the Radar


Follow and listen and then look out the window to see your next task. Then
go with the man to the trap door. Drop down it and start clearing the boards
from the window. Send a saw blade through the window to take out the Zombine
and whatever else is standing on the other side. Use the gas tanks in here and
the other saw to take out as many zombies as you can. Then you can run out and
take out all the rest, or just run to the back of the truck on the right and
get out of this place. There are just two crates in the sludge on the left, so
if you don't mind you can just move on. Jump on top of the truck when you
want and clear the window to jump through.

Open the door and drop down for more zombies. Kill them, or let the guns across
the way get them. Either way, move forward along the partial wall to find the
hole in a fence. Crawl through and stay low to avoid being shot up. Crawl
forward and into a pipe. Kill the headcrab on the other side, or just use the
GG to keep it at bay until it dies.

Break the crate and pick up some grenades. Crawl forward, staying behind the
cover of the cars, and peek around the corner on the right to find a turret
along the fence. If you move slightly out into the open it will reveal its
location. You need to toss a grenade in its direction in the hopes that you
knock it over.

Go forward and toward the building at the other end. Eventually you will be
behind some bigger vehicles and you can stand up. When you're ready, poke your
head through the window and start firing on the soldier inside. Then hop in
and look for another guy out the other window. Collect some supplies and then
find a car with an open back that you can crawl through.

In the next path you will run into more zombies, and hopefully the guns will
get those and the headcrabs. Move quickly because the torso zombies will keep
spawning. Go through the white car and ignore the first soldier you see
chasing a torso, just keep following the trail of cars. Kill the next soldier
you see if you can get him and keep moving. There will be a fast torso at
the end, so have your shotgun ready. When you finally reach the end of the
cars, you can stand up.

At the back and around the corner is a Zombine, if you want to meet him. Just
jump on top of the truck, kill the headcrab, and collect some ammo. Jump on the
roof and kill the soldiers remaining in the junkyard. Then turn to see some
glass that some soldiers have probably broken. Just start tossing grenades
down inside and in all directions. Go back to the truck to get more. Drop down
inside when you feel the coast is clear, but the Combine may have dodged some
of your frags. You know all is clear when the game auto-saves.

Drop down and collect all the items inside. Refill your grenades with the
box in here and then go to the wall with the guns. Press the red button to
open some case. Get out a grenade and drop it inside (LT on 360) and then
stand back. The thing will blow and take out the guns, and open up a path
for you to exit.

Go outside with your shotgun and take out the zombies in your way. Make your
way toward Alyx and head back to the garage. Hop in your fixed car and head
out.

Move across the small bridge and into the sludge which you are safe from. Zip
by the zombies and you will see a blip for a radar cache. Keep moving until the
yellow dot on the screen in your car is in the center. You should stop at a
white van in the path. Go around to its back and stand away. Shoot the red
barrel to blast away the car on top of it. Now bust the crate from the back
and shoot the items toward the hole on the side. Go to the hole and pick up
the items.

*NOTE: To get the achievement credit for finding a cache, you must break the
crate with the radar on it.*

Proceed until you see two more yellow blips. Stop by a building with a white
van stuck in its side and go through the van. Inside, grab some grenades and
examine the big metal plate in the center of the room. Use the GG to knock it
back down and then you stand by the van. What you will do is drop a grenade
down below the plate, stand on the plate, and then get blasted up to the power
generator. When you do, press the button to unlock the gate below, and then
collect your rocket launcher and other items.

Get out and get in your car to go across the road and enter a junkyard. Go to
the tiny shack up the path and get out. The cache is under the floor. Start
pulling the floorboards and you will see the many crates underneath. It's not
the best of rewards, but it's something. Fight off the zombies, get in your
car, and cruise on down the road to the tunnel on the right.

After you emerge you will soon get another blip. Turn left and go up the
road. It will wind and bend around a bit, but only get out when the blip is
very close. The cache is behind a downed tree, and through a hole in the rock.
Crawl through, move the rocks out of the way, and claim the small reward. Get
back in your car and keep going.

You can get out when you reach a couple of building in the road, but all you
get are some health packs. Just go around the cars and keep to the road. But
when you bend around a big house, you might consider getting out and going
inside. The basement has a headcrab and crossbow ammo, and the rest of the
place will fill up your suit armor. That's all, get back on the road.

But when you try to follow the road you will fall into a trap. Now you must
fall back into this house. Your best move would be to go to the big living
room area and try to snipe as many soldiers as you can. Eventually they will
start to try and enter the house, so when you're out of ammo, go to the
entrance and greet them. Just keep moving around the various areas of the
house to get them to show up.

Go down to the basement and then come up back to the living room. A Hunter
should try to get inside, but if you have one alt round in your rifle, use
it now (press LT) and that should take out the Hunter. There are still some
left. Now go to the basement where you might run into one. Get around it and
fight your way to the yard area. Or you could use the living room door when
a Hunter busts that open.

When in the yard just use all the tools you have left to finish off this
ambush. Rifle rounds work well, and so does the rocket launcher. However you
do it, do it.

After that, make your way back down the road you came. You run into another
Hunter and some soldiers at the first set of buildings. Take them out, maybe
with a bunch of lucky grenades, and then collect the items. In the building
on the right will be a force-field guarding the power source of the other
shields, as well as a turret. Go to the right and get by the fence and use
your GG to pull the turret out of position. Then Alyx will take down the
fields. Go into the room and then you're stuck.

Look to the right to find a ladder with a lock. Break it and climb up. Move
the crates out of the way and follow a narrow path around to a raised space.
Jump into this space, kill the headcrab, crawl across the pipe, and then drop
down behind the field. Grab some rifle ammo and then move some crates to
reveal a crawlspace. Go through and blast the ball with your GG to unlock the
road. Go out of this room and take Alyx back down to the car. There is an
open building to the right of the car with suit armor and health. Get in and
start drivin'.

Hop off a ramp to keep on track. Past a burning car, follow this road onto a
bigger road and follow it. Soon you see the final radar cache sign. Hop out
of your car and go around a rock and look up. The stuff is up there, but I
could not find out how to get that stuff down. All you need for the achievement
is to crack one crate, so do that. As far as getting the items, you could blast
them out with some rockets of SMG grenades, if you think the rewards are worth
it (you get one SMG grenade with it, so you may as well). Anyway, keep going
down the road and into a tunnel.

Follow the road just a bit until you see an opening in the railing on the
right. Go down and hang left until you hit the gate. Get out and go around on
foot. Approach the dropship to find a STRIDER!!! But perhaps the best pet in
the world will show up and all you have to do is watch.

*NOTE: Make save slots if you want that achievement. One here and one as soon
as Dog clears the ship. Come back to that one if you lose and want another
shot.*

After, Dog opens the gate, so get your car and drive through. Pick up Alyx as
the Dropship is moved. If you want to beat Dog, you have to get moving ASAP.
When you round the corner, go up a path on the right and follow it to the
base. The trick is to use your turbo three times: once at the start, once up
the hill, and then once during the final stretch. Try not to use turbo during
curves or near that bend at the top of the hill with the railing. Any collision
during a turbo is instant-loss.

Either way, at the base follow Alyx.


Chapter 6: Our Mutual Fiend


Move through when told and you can stop to listen to some funny stuff with
the teacher and students in here. Move along to have the family reunion, so
sit back and watch and be awkward a bit. Follow them down a lift to have more
of the active cutscene. In the silo you will eventually be stuck with the
new guy. He opens a hatch, so go down.

Take the elevator to the lower level. Get out and find a pipe spewing steam.
Turn the valve to get through (steam, valve, get it?). At the door, look right
and bust the glass and throw the switch. The door will jam, but the Vort will
let you through. So keep going.

Make a quick stop of the supply area on the left and then proceed. Follow the
red lights to some guys that will try to lead you on, but that doesn't work
out so well. Go down the steps near the door that closes, turn around, crouch,
and crawl under the steps to find a path.

Crawl until you reach a room with three Hunters fighting some allies. Use the
energy ball in your rifle to kill two of them, or at least one, and then finish
off the other however (there are lots of gas tanks in here). The crates only
have medkits, so get to the upper catwalks and find a ladder leading up. Turn
the valve to clear the steam on the ladder.

When you move down the corridor, back up as the flare is thrown and let the
soldier come to you. Poke around the corner and let the other two charge after
you, but then retreat a bit and blast them with your SMG. Then get out your
GG to grab and toss the turret. Go straight down this hall and kill the two
soldiers near the water.

Get out your crossbow as you come into this room and start sniping the soldiers
at the other end. Then hug the left wall and knock over the turret on the
platform, but it isn't really looking at you. Use the GG to grab the two gas
tanks across the way and launch them into the other turret guarding the
other path. Go into the hall and kill the two soldiers up the slope.

When you get to the top you run into a Hunter. Use three SMG grenades if you
have them and then a few bullets to kill it. Now go up and into the little
area for some supplies. Follow the corridor and then look to the right beyond
some debris, two soldiers will try to ambush you, so be ready. Enter the next
room and go up the steps to hop over the fence. Collect the supplies and then
dive into the water.

Swim through and hop out while under fire on the other side (this is where
the guys came from that ambushed you). Emerge quickly and get to cover. Climb
up the ladder and then the next. You will be under fire, so quickly get rid
of the bad guys. Go around the walkway to the next ladder and go up. Don't
worry about nothing, just get to the top, kill a few bad guys, and head down
the tunnel. Crack some crates under a staircase and be ready for some soldiers
as you go up.

Wait for the manhacks to come down and kill them. Hide behind cover and toss
some grenades across the gap and into the room. Then go right and crawl under
some debris to get over there. Quickly crawl through the broken window and
pull the lever to close the silo door. You can man the gun here and shoot the
guys up top, but you don't have to. When some bodies appear across the way
on your level, don't shoot, those are your friends.

Collect the items here and around and then join them. Follow them up to the
door and keep going. Well, after avoiding near disaster everyone seems pretty
calm about all this.

Follow Alyx into the computer room where you learn quite a bit. Then follow
Dr. M when he shows up. You learn of a new toy and you get to test it. I'll
shut up and let him guide you through the test. Don't miss all the handgun
ammo in the corner. Follow Dr. M when you're ready.

In the garage you get briefed on the mods to your car. Make sure you have the
items in this room and then hop in your ride. Go out and through the fence,
then go straight until you find the railway. Follow it and go right when you to
to a structure with some men gathered. Get out and go to the meeting.

*NOTE: I think the only way to defend the buildings is to use the car and the
bomb slot at the back to quickly get to the Striders as they appear. But if you
just want to do this all on foot, you will probably fight most of the
Striders near the gate to the base. It works that way, but if you want to
drive around and get them quickly you can try. Make a save slot here if you
want to try for that achievement.*

Soon after a Strider will approach from the left side of the rail. It will
bring a Hunter with it, so focus on the Hunter first. When it is out, get a
bomb from the capsule and send it to the body of the Strider and shoot the
sticky bomb as you did in practice. If you let the fight go too long, the
Strider will make its way down the rail, so just use the bombs provided in
the building along the way. Stock up with supplies in this building.

Then go back to the saw mill where another Strider will come from the right.
Again, kill the Hunter and then take out the Strider.

*NOTE: Always bring a bomb with you, and drop it somewhere as you fight the
Hunters. After they are gone, you should have time to pick it back up to use
on the Strider. If you carry it with you the whole time and try to attack the
Strider's front, you'll lose that bomb.*

Then another will come from the far right side of the area, near the water
tower (if you look in the right direction you should hear the footsteps). It
will have two Hunters guarding it, so take them out and handle the big guy.

*NOTE: On one encounter I had used a bomb I had dropped in an area previously.
You can try laying out some bombs during the calms, especially in areas where
no pods are around.*

The next comes from the far left, and again with two Hunters.

The fifth one comes from the saw mill, which is probably not standing any more.
This one has three Hunters at its feet, and hopefully you have some energy
balls to help if you've visited a few of the buildings.

During that fight, another comes from the water tower area. Then the next comes
from the cranes (far left). I believe the one from the water tower didn't have
any Hunters, but maybe they were taken out. Either way, handle the one from
the water tower first, then take the one from the far left.

Then it's back to the water tower. This one comes in fast, so intercept it
along it's route, which should be near the double-house area around the middle
of the field. It will be ahead of its two Hunters, so take them on when they
arrive.

After that, it seems like all is over, but there will be Dropships bringing in
more. The first lands near the cranes, then the saw mill, and then the water
tower. This is the big one, they are coming from all sides. Go after them in
order. Go left and take on the Hunters escorting the crane Strider. You should
use the bombs around the center area to take this one out, then not far from
him should be the one from the saw mill. Handle both and during there will be
two more dropped in the same locations these two came from. But you need to
handle the one from the water tower.

By the time you even think about the one from the water tower, almost all of
the Striders will converge on the center area. Some will have Hunters, a few
won't. Just take out as many Hunters as you can, but you need to focus on the
big guys. Don't forget that you can stop by the buildings to pick up supplies,
but you probably won't have time for that. Just handle the last three Striders
and you're done. Mop up the surviving Hunters and that's it, base defended.

Return to the base, on foot if you wish, and go inside. You run into Alyx and
she brings you up to speed.

Chapter 7: T-Minus One


After the appreciation of Dr. M, Alyx takes you up to the control room for
the launch. Soon you get the honors of pushing the big red button, so do it.
Go outside when the doors open and have a little chat with Eli. Then go watch
the results of your efforts.

Enter the building and just sit back and listen the rest of the way. And when
you get to the last scene, don't forget to look around so you don't miss any
of the action.
End game.:D


Last week The Pirate Bay received a very prestigious award. The award has not been granted before to our knowledge so we’re extremely pleased about it.
We received the ‘Global Icon-status’ award, handed to us via the Swedish Ministry of Communication, but the originator where the award comes from is the organised global copylobby.
The award is signed by such famous people as John Kennedy (Chairman at IFPI.org), Alison Wenham (President of Worldwide Independent Network), Jonas Modig (President of Federation of European Publishers), Ana Maria Cabanellas (President of International Publishers Association), Kjell-Åke Hamrén (President of The International Confederation of Music Publishers), Helen Smith (Secretary General, Independent Music Companies Association) and Kim Magnusson (Chairman of European Film Companies Alliance).
As you can see they are all very mighty people and The Pirate Bay is truly happy about the award.
The motivation for the award seems to be the swift and decisive path TPB has taken since day one. To promote international cultural exchange, fight for freedom of communication and speech. They also seem very interested in the fact that the community has helped translate the site into 30 different languages, which TPB is really proud about as well. We promise that we will continue to translate the site to more languages to make it easier for everybody to use it!
There are sadly some misinformation in the award letter. They seem to think that TPB is actually illegal and are very concerned about this! But I can reassure you, the site is not illegal so there’s no reason to be alarmed.
It’s recognised worldwide as legal and helpful for the normal people around the globe that have something to share with each other. And we all do want to share!
Thank you very much for the award and hopefully we might be able to give an award back at the next Polar Pirate Prize award show in Stockholm! More information about PPP2008 will be revealed with in some weeks.
Other links about the award we received: Oscar Swartz
Don't Stop Your Seeds
One of the most confounding things I've come across as a mod are users who try to shift the blame to their ISPs when a quick check on their profile reveals that they are not seeding at all. Why did you stop your seeds?? You have downloaded 30gb worth of stuff, go seed some of them back for goodness sake.
There is no point in seeding 20 files at the same time
Hey look, you have a limited upload of 128kb/s (ie 128kb/s = 16kB/s). Seeding 20 file at the same time will really just backfire on you.
Firstly, Each TCP connection that you make will add additional overhead to your bandwidth, thus lowering the amount of actual data capacity. What this means is that each torrent will only be effectively seeding data at very low rates.
Secondly, bittorrent clients are designed such that when your peers see that you are sending data so slowly, chances are that client will snub you and prioritise incoming data from OTHER clients ahead of yours so you not only do not fully utilise your bandwidth for purely sending useful data, you are also rejected by your peers.
Limit your upload slots per torrent
In most clients, you can change the max number of upload slots per torrent. Limiting this to a reasonable amount such that each upload slot gets a reasonable amount of bandwidth will help your seeds. The same logic applies as above. Having too many connections or seeding too many torrents at 1 time will be detrimental.
Basically the rule of thumb is to not spread your upload bandwidth too thinly across too many connections. What you want to do instead is to fully utilise your UL pipe for sending pure data.
Strategize what you decide to seed
And in relation to the above 2 tips, now that you have decided to only seed a few files at a time. Which one do you actually seed? A good rule of thumb is to seed torrent with a low seeder to leecher ratio. If you use Azureus, it keeps track of this data for you even when your torrents are not seeding so just pick the best torrent to seed and stop the rest.
Another strategy is to frequent the request forum. If you pick upon a request, you not only get to be the first seed, you also get the eternal gratitude of the requestor.
Do you really have to download 50 torrents at the same time?
Look. It really makes no sense to be complaining that you can't help having such a bad ratio. Of course you can't help it. Medical science has no cure for lack of common sense. You should consider your ability to seed back before you download.
Cap/Limit your downloads speeds to match your upload speeds.
This advice should be golden to users with a heavily unbalanced DL/UL pipe. It is human nature to want to grab grab and grab some more as fast as we can. If you have wonderful DL/UL speeds and can make up the deficit within a few days, sure go ahead. If you have a measly 3mbps/16kbps bandwidth, you will rub your hands in glee downloading 30gb worth of Photoshop DVDs within 3 days but spend the next week frantically trying to make up the deficit on a horrible UL capacity only to realise it is impossible and then you experience ratio problems. Well instead of complaining that you have slow upload bandwidth, if you cap your download bandwidth to match your upload capacity, you will not have this problem.
I know some that this is a step many of us are reluctant to take but hey if you think about it, it's quite logical after all. A typical lynda.com title averages 18 hours of training time. If you limit yourself to 1 download at a time at capped speeds, by the time you finish watching your first lynda.com title and take a break the rest of the day, your next lynda.com title will be done and ready to be tackled. And this is ....uming that you watch all the training videos that you download back to back.
Think about it. How many of us have tons of material sitting in your HDD that remains unwatched or unused just cause you can't afford the time to go through it as yet. Why be in such a quick rush to grab all those GBs that just sit idle and take up space and give you a major ratio headache? Limit your downloads at a time and at CAPPED speeds.
Upload fresh new content
This has got to be the most obvious advice. Not only will you boost your ratio, but you will improve the choice of content for other members and get a warm fluffy feeling inside knowing that you have made people happy.
Frequent the request forum
If you pick upon a request, you not only get to be the first seed, you also get the eternal gratitude of the requestor. Filling requests really fosters the community atmosphere - please do it if you can.
Check your own torrents
By clicking on your username or "my torrents" to see if a leechers are waiting for a seeder or a torrent you have needs more seeders. If the seeder:leecher ratio is low - help!
Check your torrent history
This wonderful feature lets you review all other torrents you have uploaded or downloaded that are still on the tracker. Please check this regularly. It will often be the case that a swarm you stopped seeding to few weeks ago really needs your help!
*** *** *** *** *** ***
Total Share Ratio vs Ratio Per Torrent?
Some users are attempting to get each torrent they seed to a 1:1 ratio for fear their *Overall Share Ratio* will drop if they do not do this.
Users need to be more concerned about their Overall Share Ratio instead of single torrent ratios. Some users are sacrificing great opportunities to seed and increase their share ratio by dividing their bandwidth with torrents that have plenty of seeders.
Lets say you're seeding a 2GB file or a 150 Meg file with 50 leechers and no one has completed leeching to help seed. And that you are seeding three torrents that each *already* have 10 - 50 or more seeders.
There is no reason to keep seeding the three torrents that already have 10+ seeders. The only thing this does is prevent you from seeding at your optimum rate which prevents you from obtaining the best user Share Ratio you can get because they slow down your total upload rate.
In this case, the additional open torrents also slow down those 60 leechers of the brand new 2GB file or 150 Meg file which only you are seeding and no one else is.
I'm not saying it's not important to seed each torrent to a 1:1 ratio. It's simply better to stop the other three torrents with 10+ seeders to allow maximum bandwidth for your 2GB file or 150 Meg file until you have seeded long enough to have (ideally) nine other helpers.
You can resume seeding the other three torrents to a 1:1 ratio hours or days later when there are less seeders, when newcomer leechers are needing the file and because it is better for your own bandwidth and Overall Share Ratio in the end.
This is a tutorial to fix the error message: "Please Insert Disk 1" or 'Please Insert the Correct Disk'
What you need to do is install the crack.
There should be one that comes with the torrent. It will either be in the torrent in a folder Called Crack or it will be in the .iso.
If one did not come with the torrent you should be able to find one Here
So first step is to get the crack. If it's in a folder or you downloaded it from the above link you can skip this step.
1. Getting the Crack from the .iso
Mount the Image
Now Go to My Computer Right Click the Drive and Select Explore
Now There Should be a Folder Called Crack or the Name of the Release Group
In the case of this example it's the name of the release group- Fairlight.
Now Go to The folder with the Crack(s) in them.
Now leave that Window Open.
2. Cracking the Original Executables
Now you need to go to the installation directory of the game you are trying to crack.
It should be something like: C:\Program Files\Developer
In my case it will be D:\Program Files\Flagship Studios\Hellgate London
You can move the folder that has the cracks in it from the image to that directory.
Windows Will Ask if You Want to Replace the Folder
Click Yes.
You're finished. The game should now work without a disk. You can do the same thing without the folder and just the executables.
This guide relies on the use of Azureus or uTorrent as they are highly recommended. Azureus requires Java. If after installation the application will not load, it is because you do not have Java. You are not the first to think you have Java when you do not! More information is available on the Azureus site.
If you are not currently using uTorrent or Azureus, before starting this guide:
Beginners: Please change to either uTorrent or Azureus now.
Intermediate: It is recommended that you change client now. If you choose not to, remember to come back to this section if you get stuck during the guide.
Advanced: You will likely be able to find the equivalent options in your current client, assuming your client has all the necessary options.
Other BitTorrent clients are available to switch to after working through this guide.
This guide has been updated for Azureus 2.5.0.0 and uTorrent 1.6. Different versions may vary.
Contents:
1.0 Why are my downloads going slow?
- 1.1 Reason 1: Your ISP is limiting your download speed
- 1.3 Reason 2: You have a “NAT Error”
--> 1.3.1 How do I know if I have this problem?
2.0 Fixing a NAT error
- 2.1 Switch off UPnP
- 2.2 Configure Your XP Firewall (ICF: Internet Connection Firewall)
--> 2.2.1 Configure ICF in SP1
--> 2.2.2 Configure ICF in SP2
- 2.3 Configure Your Router
- 2.4 Configure Microsoft Internet Connection Sharing (ICS)
- 2.5 Configure Your Firewall
3.0 Multiple BitTorrent users on a LAN
1.0 Why are my downloads going slow?
1.1 Reason 1: Your ISP is limiting your download speed
Some ISPs are limiting download speeds by controlling the bandwidth allocated to traffic using the default BitTorrent ports, which are 6881 to 6999.
This is not just a problem for those who have nasty ISPs, it affects everybody. To avoid ISPs from damaging the efficiency of a torrent with their controls, some stringent tracker owners are blocking users trying to connect on the standard ports.
So whether your ISP is limiting you or not, all BitTorrent users should stop using the default ports.
For simplicity, this guide recommends the use of port 16881. Adding a 1 to the start is simple administratively, and is in a range unlikely to be used by other programs.
You then need to set up your client to use the new port.
AZUREUS
Tools -> Options -> Connection
-> Add a “1” before the current listen port number. For example, 6881 will now be 16881.
uTorrent
Options -> Preferences -> Connection
-> Type 16881 for the port number for incoming connections. Untick the box for Randomize Port.
Whatever client you use, make sure you update anywhere else you have entered the port numbers to account for the change.
By completing this section, you have helped to avoid problems later down the line, but this will not solve the majority of slow downloads. Therefore, move on to reason 2.
1.2 Reason 2: You have a “NAT Error”
BitTorrent works on a credit system. By uploading parts of a file to other people, they allow you to download parts of the file from them. This is BitTorrents anti-leech measure. However, if you have a problem with your NAT (anything between you and the internet, such as a router or firewall), you will not get credit for what you are uploading. The only downloading that you can do is from people who upload a small amount to you in the hope that you will return the favour. Since their client will not recognise your response if you have a NAT problem, then they will stop uploading to you shortly after. This is what is causing your problem. You may also notice that torrent speeds go very high for 5 minutes, before slowing back down to 0-5kb/s.
1.2.1 How do I know if I have this problem?
You might not have a problem at all. Before continuing with this guide, leave your torrent running for at least ten minutes. If the speed hasn't picked up, stop and restart the torrent. If that fails, try at least two other torrents. If you are still having problems, continue on...
Start to download a file using your chosen client.
AZUREUS
Wait a while for the torrent to get started; this may take up to five minutes.
Look in the “Health” column. If it is showing a yellow spot, then you need to configure your firewall/NAT/router. If it is Green then all is OK. Your slow downloads are being caused by something else.
A full list of the different colours can be seen [http://azureus.sourceforge.net/faq.php#21]here[/url].
Azureus can also check your configuration for you.
Select “Tools” -> “NAT / Firewall Test”
The default TCP listen port is 6881. If you have changed the listening port, enter the new port in the “Incoming TCP Listening Port.”
Press “Test”
If the result is “NAT Error,” please continue with the guide.
If the result is “OK”, then your slow speeds are being caused by something else.
PLEASE NOTE: The Azureus checker can report a false NAT error if you are running PeerGuardian or Protowall. Make sure these are disabled before using the Azureus wizard.
uTORRENT
Wait a while for the torrent to get started; this may take up to five minutes.
On the status bar, look for either a yellow warning triangle, or a green dot. If there is a yellow warning triangle, then you need to configure your firewall/NAT/router. If it is green then all is OK and your slow downloads are being caused by something else.
uTorrent can also check your configuration for you.
Select “Options” -> “Speed Guide…”
Check the current port is set to the port used in the first section, i.e. 16881.
Click “Test if port is forwarded properly”.
If you get an error, then continue to follow this guide. If the port is correct set up, then skip to the section 4.0 – “Other things that could be wrong”.
2.0 It’s showing yellow / warning triangle, I have a NAT error – what do I do?
You need to configure your computer and/or network to accept incoming BitTorrent port connections. The tracker port is 6969. If this port is not correctly configured, downloads will not start at all. The download/upload ports used in this guide are 16881-16889. It is these ports that are causing your problems.
2.1 Disable UPnP
Universal Plug and Play (UPnP), it is a feature that works with some compatible routers to open the required ports automatically. However, some routers, even if they are compatible with UPnP, have problems with this.
AZUREUS
Tools -> Options
Expand "Plugins" on the left hand tree.
Select "UPnP"
Deselect "Enable UPnP"
uTORRENT
Options -> Preferences -> Connection
Deselect “Enable UPnP port mapping”.
2.2 Configure Your XP Firewall (ICF: Internet Connection Firewall)
Please go to the appropriate sub-section.
- “Configure ICF in SP1” if you have NOT installed Service Pack 2
- “Configure ICF in SP2” if you have installed Service Pack 2
2.2.1 Configure ICF in SP1
Open up your “Network Connections”. Right click on your internet connection or LAN connection and select “Properties”.
->Select the “Advance” tab
->If the “Internet Connection Firewall” is not ticked, then this is not your problem. Research into whether you need the XP firewall or not and jump to "Configure Your Router" below. If it is ticked, please continue:
->Click “Settings…”
->On the “Services” tab press “Add…”
->Description of service = BitTorrent
Name or IP address of the computer hosting this service on your network = 127.0.0.1 (this means "the local machine.")
External Port number for this service = 16881
Internal Port number for this service = 16881
TCP/UDP = TCP
-> Press OK.
-> With uTorrent, make sure Options -> Preferences -> Connection -> "Port used for incoming connections” is equal to 16881.
-> With AZUREUS, make sure that "Tools -> Options -> Connection -> Incoming TCP Listen Port" is equal to 16881.
Check if the torrent/health has gone green. If not, move on to section 2.2.
2.2.2 Configure ICF in SP2
-> Open your Windows Control Panel and select “Security Centre.”
-> Scroll down to the “Manage security settings for:” section and select “Firewall”
-> Decide whether you want to keep the firewall on or off. Make an informed decision based on more than the information provided by Microsoft. If you decide to switch it off, then do so and move onto section 2.2. Otherwise, continue this section.
-> Select the “Exceptions” tab.
-> Select “Add Port…”
-> Name: = BitTorrent (or anything of your choice)
-> Port number: = 16881
-> TCP/UDP = TCP
-> Press OK.
-> With uTorrent, make sure Options -> Preferences -> Connection -> "Port used for incoming connections” is equal to 16881.
-> With AZUREUS, make sure that "Tools -> Options -> Connection -> Incoming TCP Listen Port" is equal to 16881.
Restart the client and wait five minutes. Check if the health has gone green or that the warning triangle has vanished. If not, move on to section 2.3.
2.3 Configure Your Router
If you are on a LAN with a router or hardware firewall, you may need to configure it. You need to forward BitTorrent’s connection ports to your specific PC on the LAN.
If your connection is shared using Microsoft Internet Connection Sharing (ICS), go to section 2.3.
There are too many routers to cover in this guide, so it is time to head to Google. Search for port forwarding, BitTorrent and the name of your router. Lots of manufacturers provide specific information on their sites. A generic guide to port forwarding for most routers can be found at PortForward.com.
-> With uTorrent, make sure Options -> Preferences -> Connection -> "Port used for incoming connections” is equal to 16881.
Cable Modem hacking is a medium-difficulty task. In this tutorial I will show you how to hack a cable modem, get free internet, and free Cable TV (if you need it). Please note that all of this is VERY illegal. Theft of service is a felony.
Cable TV Network Design
This picture appears to be a little dated
Local office - has the uplink; connected to the nodes
Local node - a router connected to the community hubs; you have to use a MAC address from another node or you won't be able to get online
Community hub - These are the little green boxes that serve your house; these are connected to bigger and bigger hubs until it's connected to the node.Each node serves several hundred people. When you go on the network, you get automatically assigned an IP address. It checks your MAC, and if it's not registered it tells your computer to use a private DNS server that gives you a "Buy our service" page when you try to go anywhere. But you can just use a different DNS server. If it is registered, you can get access immediately (you borrow someone's MAC from another node); alternatively, you can set your modem to force network access.
This is an estimate of the cable TV network. This is backed by the fact that users have been using uncapped, unregistered modems for years and have not been caught. Cable companies can pinpoint your location down to the neighborhood level. Anyone who says otherwise is ill-informed.
Resources
TheoryShare
TCNiSO
Hardware Required
To successfully obtain free, uncapped internet, you need to have a modem which has been hacked:
Motorola SB3100
Motorola SB4100
Motorola SB4200
Motorola SB5100
AMBIT 120
AMBIT 200
AMBIT 250
RCA 245
WebSTAR DPC2100
However, for tutorials on most these you will need to look elsewhere. This tutorial will focus on the SB5100, as it is the easiest to modify (although the SB4100 and SB4200 may also be modified by this method).
You can pick up these modems on eBay. Alternatively, you can buy a pre-modified modem at TCNiSO or Theoryshare. I recommend TCNiSO, as Theoryshare uses illegal copies of the BlackCat software that TCNiSO made.
You will also need a JTAG cable, which you can make yourself (you'll need a 10-pin header, and a ribbon cable that will connect to it, as well as a parallel port plug you can solder the ribbon cable to, as well as a solder iron) or you can buy it from TCNiSO or Theoryshare (again, TCNiSO is recommended). Besides being official, it's better made. The TCNiSO cable will include an OFFICIAL license for the BlackCat software.
Software
You'll need BlackCat from TCNiSO.
http://www.megaupload.com/?d=R5U6YG8I
Guide
Step 1: Solder the header
Kind of blurry, but easy to follow. Grab your 10-pin header (get from radioshack or desolder from an old electronics board). It'll have a black plastic piece with 10 pins sticking out of it. One side will have more pin sticking out than the other; looking from the top of the cable modem, place the short end through the holes. Use some electrical tape and tape it tightly to the board. Torn it over, and solder the pins to the board. Make sure that the solder doesn't touch any other electronics or pins. Make sure that you don't heat any pin long enough to melt the plastic shroud; this will set you back a bit, as you will have to melt the shroud and push the pin back in place.
Take note of the pin hole that has the square.
Step 2: Making the Cable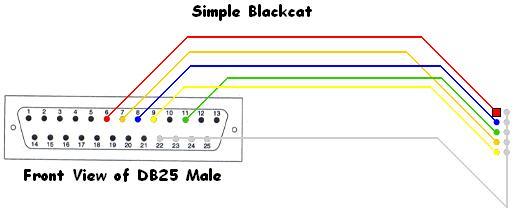
Very simple image, easy to follow. You'll need a DB-25 connector, with access to the pins on the back (so you can't just rip apart a printer cable; go buy a proper one at Radioshack). Picture has a bunch of circles and one square. See this to find out what it will look like on your board. Please note that this is a view of the FRONT of the connector (so everything is flipped around when you solder to the back).
I would recommend getting as long a ribbon cable as possible.
Step 3: Install Blackcat Software
I don't think I need any pictures or special instructions. There's a download link above. Install it.
Step 4: Connect cable to modem
Make sure you connect the cable the right way. Also make sure you connect the power cord to the modem and wall.
Step 5: Connect cable to PC
Plug the cable into the parallel port. Recommend setting it to ECP+EPP in your BIOS.
Step 6: Start Blackcat software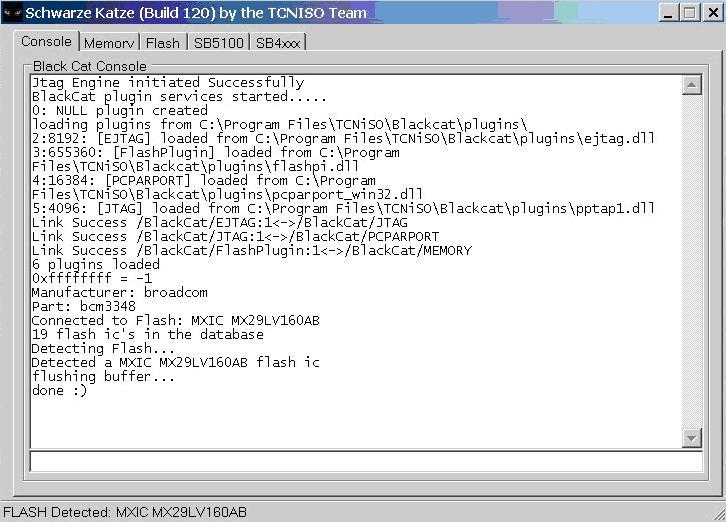
When you start BlackCat, if everything is working properly and you didn't screw up the cable, your screen should look something like this. It's very important that it reports the manufacturer and part, and that it connected to the flash. If not, nothing will work.
Step 7: Detect flash
) Click on the 'Flash' tab, click 'Detect'. Check confirmation that the flash is detected.
"Detected a MXIC MX29LV160AB flash ic"
Step 8: Backup your entire flash
On the flash tab, click Read All and save the file somewhere. THIS IS A COMPLETE BACKUP OF YOUR MODEM. If anything goes wrong, you'll need this to restore it. It will take about 10 minutes. Make sure the box on the right (under Size) says 0x00.
Step 9: Bootloader
Go to the SB5100 tab. Under "Install new bootloader", click the folder and open up "SIGMAX-BL_v2.6-LITE.bin" (look in the software download link above). Then click flash. (if you get a Device not connected error, restart. If you still get it, you messed the cable up, or your parallel port isn't configured properly)
Step 10: Firmware
On the SB5100 tab, click "Check" at the bottom. Then click Program. It should ask you to find a file. Download this file: http://rapidshare.com/files/30844399...build.13.5.zip unzip it and use the .bin inside there (it's the bin other than the bootloader).
Step 11: Reboot Modem
Disconnect the cable from the modem. Remove the power cord. Connect your computer to the modem with an ethernet cable. Plug the power back in.
Step 12: Online configuration
Set your IP address to 192.168.100.2 (gateway 192.168.100.1, mask 255.255.255.0).
Enter "http://192.168.100.1:1337" into your browser. If you see a Sigma page, you did good. Change the last few digits of the MAC and Serial (keep the serial numbers only, and keep the MAC 0-9/A-F) so you don't get caught. Turn on baseline privacy and stealth mode, and forced network access. Turn off all the others.
You also need to change the conig file. Check the forums at theoryshare.com or tcniso.net to see what config file you'll need to change it to.
Step 13: Change IP
Change your IP to automatic. It should pull a new IP from the modem, and you should now have internet access.
Additional Help
Inside of the software package listed above, you will find additional guides and images to help you in your quest.
1. Hack the max half-open TCP connections
If you’re on XP sp2, your TCP connections are limited to a maximum of 10. This might hurt your downloading speed because it wont let you connect to as much peers as you want. It is supposed to slow down viruses because their spreading strategy is to connect to a high amount of ip numbers, but it could cripple your torrent downloads.
A nice way to fix this is to download this patch.
Note: Some people report that their antivir reports the patch to be a Virus, This is not the case. Check out http://www.lvllord.de/ for more details on this
The patch allows you to set the maximum allowed connections to any number you want. Any number between 50 and 100 is ok (more is NOT always better).
Next you need to configure your torrent client to allow 50-100 max half-open TCP connections
uTorrent: Options > Preferences > Advanced options > net.max_halfopen

Bitcomet: Options > Preferences > Connection > max half-open TCP
Now you’re ready to go…
A third point of interest is that some “windows updates” revert your tweaked tcp connections back to 10. So it’s wise to check this every now and then. You can check this by going to (in windows xp) Start > Control Panel > Administrative Tools > Event Viewer > System… Look for event 4226 (sort by event).

For more details about Windows XP SP2 and Event ID 4226 read David Kaspar’s excellent post
If there are a lot of daily occurences it’s likely that the max amount of half-open tcp connections was set back to 10. Or you’re infected with some nasty spyware…
2. Torrent Client Configuration
In order to apply these tips you need to know your maximum up- and download speed. You can test your bandwidth over here (stop all download activity while testing). Also make sure that you applied the tips provided in our previous posts.
Note that there’s a difference between kb/s (kilobits/second) and kB/s (kilobytes/second). To be precise, kB/s = kb/s divided by 8. In this tutorial we use kB/s (like most torrent clients do). This means that you might need to calculate your max speed in kB/s yourself if the speedtest only gives you the results in kb\s (so divide by 8 then).
Settings 1-4 can be found in the options, settings or preference tab of most torrent clients.
1. Maximum upload speed
Probably the most important setting there is. Your connection is (sort of) like a pipeline, if you use you maximum upload speed there’s not enough space left for the files you are downloading. So you have to cap your upload speed.
Use the following formula to determine your optimal upload speed…
80% of your maximum upload speed
so if your maximum upload speed is 40 kB/s, the optimal upload rate is 32kB/s
But keep seeding!
2. Maximum download speed
Although setting your maximum download speed to unlimited may sound interesting, in reality it will only hurt your connection. If you still want to be able to browse properly, set your maximum download speed to:
95% of your maximum download speed
so if your maximum download speed is 400 kB/s, the optimal download speed is 380kB/s
3. Maximum connected peers per torrent
Yet another setting that you don’t want to max out. I experimented quite a lot with the max connected peers settings and came to the conclusion that both high and low number hurt the download speed of a torrent. The following setting worked best for me.
upload speed * 1.3
so if your maximum upload speed is 40 kB/s, the optimal amount of connected peers per torrent is
40 * 1.3 = 52
I didn’t noticed a difference for fast or slow connections here.
4. Maximum upload slots
1 + (upload speed / 6)
so if your maximum upload speed is 30 kB/s, the optimal number of upload slots is
1 + (30 / 6) = 6
***********************************************************************************
3. More Tips
Check seeds and peers
A simple tip, but very important. Always look for torrents with the best seed/peer ratio. The more seeds (compared to peers) the better (in general). So 50 seeds and 50 peers is better than 500 seeds and 1000 peers. So, be selective.
Change the default port.
By default, BitTorrent uses a port 6881-6999. BitTorrent generates a lot traffic (1/3), so isp’s like to limit the connection offered on the these ports. So, you should change these to another range. Good clients allow you to do this, just choose anything you like. If you’re behind a router, make sure you have your ports forwarded (portforward.com) or UPnP enabled.
Disable Windows Firewall
It sucks. Windows Firewall hates P2P and often leads a life of it’s own. So disable it and get yourself a decent (free) firewall, Kerio or Zone Alarm for example.
Turn on Encryption
Encrypting your torrents will prevent throttling ISP’s from limiting your BitTorrent traffic. Check out how to enable encryption in Azureus, uTorrent, and Bitcomet, the three most popular torrent clients.
Optimize your internet connection
The TCP optimizer is a freeware utility that optimizes your internet connection. I found it very useful and it helped speeding up my connection for regular internet activity and for downloading torrents. Just download it, and move the slidebar to your maximum download rate (note that it’s in kb/s). Don’t try to set it higher because that will hurt your download speeds!
Last but not least… Buy a faster connection…